Customize My Blog
In last post, I introduced how to create a vanilla Jekyll blog on github pages. Let’s review my progress.
Mission in Progress
Create the Repository & Website
- Install Dependencies
- Create a repository
- Build a Jekyll website
Customize the Blog (Basic Settings)
- Modify config YML
- Modify base URL
- Add _drafts folder
In this post, I will start to customize my blog.
Take a Glance
First of all, let take a glance at the folder structure of the Jekyll website
.
├── _config.yml
├── _drafts
|   ├── begin-with-the-crazy-ideas.textile
|   └── on-simplicity-in-technology.markdown
├── _includes
|   ├── footer.html
|   └── header.html
├── _layouts
|   ├── default.html
|   └── post.html
├── _posts
|   ├── 2007-10-29-why-every-programmer-should-play-nethack.textile
|   └── 2009-04-26-barcamp-boston-4-roundup.textile
├── _data
|   └── members.yml
├── _site
├── .jekyll-metadata
└── index.html
Explanation
-
The
_config.ymlcontains all the settings we want to customize. There are tons of configs that you can do, and many of them are very crutial. I will talk about it later. -
_drafts, just like its name, is the folder that holds your draft posts. -
_includeshas all the partials. Not limited tohead,header,foot,footer, you can store small or big components such as comments template, sharing buttons, images partials, etc. -
_layoutsholds all the templates for all kinds of pages that will glue the partials together. -
_postsis the places for all your articles inMarkdownformat. -
Maybe you don’t need a
_datafolder, but if you have some data objects you want to use in some pages, you will be able to get those array or objects later in your template. -
_sitefolder stores the final product, your whole web site. Since I am using Github Pages for deployment, I don’t need to worry aboutgitignorethis folder, Github will automatically compile and serve this folder on their server. You will not see it in your repository. -
We can also create any other folder such as
assetsorimgsfor images or other assets. -
I will also have
_sassfolder forscssfiles that will be compiled tocssfiles. -
Feel free to add
favicon.ico, andindex.htmland any other pages like you normally do.
Check the official documentation for more details.
_config.yml
# Site settings

title: Your awesome site
email: [email protected]
description: > # this means to ignore newlines until "baseurl:"
    Write an awesome description for your new site here.
    You can edit this line in _config.yml. It will appear
    in your document head meta (for Google search results)
    and in your feed.xml site description.

baseurl: "" # the subpath of your site, e.g. /blog/
url: "http://yourdomain.com" # the base hostname & protocol for your site
twitter_username: jekyllrb
github_username:  jekyll

# Build settings

markdown: kramdown
This is the default Jekyll _config.yml file. It contains all the settings plus custom variables that you can use later in your templates or posts. I will explain some of the important ones, but for all the pre-defined settings, check the official documentation for more details.
Also, becasue I am using Github Pages, there are some additional configs made by Github that will override my config. It is explained here.
lsi: false
 safe: true
 source: [your repo's top level directory]
 incremental: false
 highlighter: rouge
 gist:
   noscript: false
With that being said, the settings in the config file, are actually all optional, except url and baseurl.
url is the domain of your site. It is used to generate all links and URLs throughout the website. In my case, url is https://winddweb.github.io.
Fix the Baseurl
At the end of last post, I said there maybe some problem for css files. It is because of the path to the css file is incorrect. Here’s what it looks like: _includes/head.html
<!-- before -->
 <link rel="stylesheet" href='{{ "/css/main.css" }}'>
<!--output -->
<link rel="stylesheet" href='/css/main.css'>

<!-- after -->
 <link rel="stylesheet" href='{{ "/css/main.css" | prepend: site.baseurl }}'>
<!--output -->
<link rel="stylesheet" href='/css/main.css'>
| Note: {{ output | prepend: variable }} this is the syntax for the Liquid template with filters used by Jekyll. I will probably talk about this later. But if you are interested, check the docs |
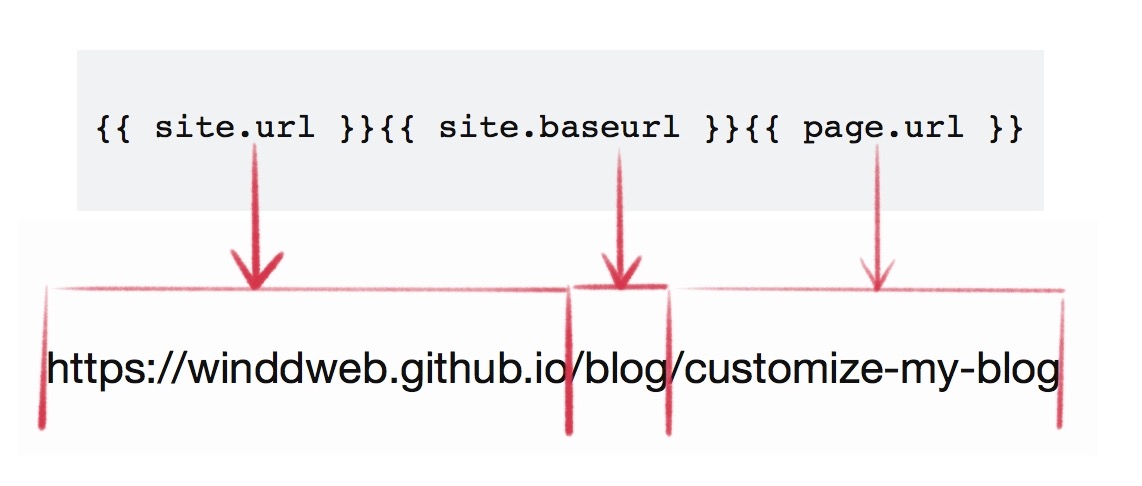
My blog is not under the root directory of the domain winddweb.github.io, which is defined by site.url (btw, this is called site variable). My blog is under the winddweb.github.io/blog sub-folder, so we need to define the baseurl variable, which is exactly the path in the middle. In my case, it’s /blog (be careful about the slashes). If your root path is deeper, it is possible to have /path/deep/er. Note: github project pages has a similar structure, for example username.github.io/project-name.
So later, wherever you need to include a link in your post, insert the site.baseurl when needed.
Parker has a good post explaining the baseurl.1
Other Official Configurations
port: 4000: This controls which port your local site will use. It is useful when you need to serve multiple websites. Just assign each website with an unique port.
permalink: /:slug: This will change the URL structure of your web pages. /:slug is a custom structure which only contains the slug of the page’s title, e.g., yourdomain.com/customize-your-blog.
include: ["_pages"]: Include folders to be processed by Jekyll. This setting will tell Jekyll to process markdown files and convert them into htmls in your site. This is useful for cleaning up your file structure. You can put all the single pages into _pages folder.
exclude: [README.markdown, package.json, grunt.js, Gruntfile.js, Gruntfile.coffee, node_modules]: Of course you can exclude some folders which are not part of the website, which are usually generated and used by other helper programs like bower, grunt, git, etc.
JEKYLL FOR WEB DESIGNERS has an awesome article that goes through some other configs. Of course, for a complete list of configs, go to Jekyll’s documentation
More on permalinks: Create Pages w/o .html extension in the URL
Other Custom Variables
All the other variables are all optional. So it depends on what theme you are using, and what variable you want to use in your own templates. Let me show an example about how some of the variables are used.
_includes/footer.html
<h2 class="footer-heading">{{ site.title }}</h2>

    <div class="footer-col-wrapper">
      <div class="footer-col footer-col-1">
        <ul class="contact-list">
          <li>{{ site.title }}</li>
          <li><a href="mailto:{{ site.email }}">{{ site.email }}</a></li>
        </ul>
      </div>

      <div class="footer-col footer-col-2">
        <ul class="social-media-list">
          {% if site.github_username %}
          <li>
            {% include icon-github.html username=site.github_username %}
          </li>
          {% endif %}

          {% if site.twitter_username %}
          <li>
            {% include icon-twitter.html username=site.twitter_username %}
          </li>
          {% endif %}
        </ul>
      </div>

      <div class="footer-col footer-col-3">
        <p>{{ site.description }}</p>
      </div>
    </div>
As you can see, the site.author.email, site.title, site.description, site.github_username, site.twitter_username are all variables defined in _config.yml like this:
_config.yml
# Site settings
title: Winddweb's Log
tagline: A Jekyll theme

description: > # this means to ignore newlines until "baseurl:"
  Write an awesome description for your new site here. You can edit this
  line in _config.yml. It will appear in your document head meta (for
  Google search results) and in your feed.xml site description.

twitter_username: winddweb
github_username:  winddweb

author:
  name:              Yifeng
  url:               https://winddweb.github.io/blog
  email:             [email protected]
So when you start a Jekyll blog, either the original one or with some themes, fill in the custom variables in the config file, and they will be used in all kinds of templates.
Working With Drafts – Add _drafts Folder
Yes, just as simple as it says, create a _drafts folder and start writing markdown files in it. The filename don’t need to have the date like the normal posts do. And they will not appear in normal building unless you run this command.
bundle exec jekyll serve --drafts
# or build
bundle exec jekyll build --drafts
Then the drafts will show up as the latest articles. When you want to publish it, add dates to the file name, and move it to _posts folder.
Let’s Take a Break
There are always too much to talk about and I really don’t want to stop but the readers will suffer. In this post, I I will take a step further in future articles. Stay tuned.
Customization To-do list:
- Permalink: should I contain dates in the URL?
- Fix fenced code block nested in un/ordered lists
- Fix the Checkbox
- Add images with captions to my post
- Add comments functionality
- Change a Theme
- Adding a Navigation
- Change the code highlighting theme
- Custom 404 page
- Create _pages folder for all your pages
- Add tags to post
- Change the About page
- Multilingual?
- Add search functionality